Understanding the JP Drain Color Chart: A Guide for Home Health Nurses
Support safer post-surgical recovery with evidence-based JP drain care strategies. Use this guide to sharpen your assessment skills, educate patients on drainage trends, and download our free JP Drain Chart PDF to help track output and reinforce clinical documentation at home.
May 27, 2025
9 min. read

Managing a Jackson-Pratt (JP) drain effectively is essential for safe post-surgical recovery, and a JP drain color chart is one of the most important tools nurses can use to monitor healing at home. As more patients transition to home health care after surgery, clinicians are increasingly responsible for assessing and educating patients on wound drainage. Recognizing and responding to changes in drainage output can directly impact patient outcomes.
In this article, we provide an evidence-based guide to JP drain care, including how to interpret drainage using a JP drain color chart, and when to escalate concerns. Plus, you can download a free JP Drain Chart PDF to help patients track output consistently and support accurate documentation and communication with providers.
What is a JP drain?
A Jackson-Pratt drain is a closed-suction device designed to remove excess fluid from a surgical site and reduce the risk of postoperative complications such as infection or hematoma. The device is composed of a soft, flexible drainage tube connected to a compressible bulb, which applies low-pressure suction to draw out accumulated blood, pus, or other fluids.
JP drains are frequently used in surgeries where fluid buildup is anticipated—such as mastectomies, abdominal procedures, orthopedic surgeries, and plastic surgeries. They help maintain a clean wound environment and promote faster, complication-free healing.
In the home health setting, it is often the responsibility of the nurse to manage JP drains, assess for signs of infection or malfunction, and educate the patient or caregiver on daily drain care. Consistent monitoring and documentation of drain output are essential to ensuring patient safety and clinical success. To support clinical decision-making, nurses may refer to tools like the JP drain color chart when monitoring output and assessing recovery progress.
How does a JP drain work?
Once inserted during surgery, the JP drain tubing is positioned to collect fluid from the operative site. When the attached bulb is compressed and sealed with its stopper, it creates gentle suction that draws fluid through the tubing into the bulb reservoir.
This negative pressure mechanism allows for continuous drainage, which reduces swelling, lowers infection risk, and supports wound healing. The drain should be emptied at least every 8 to 12 hours or when it becomes half full.1 Output should be measured, logged, and evaluated for volume, consistency, and color using a JP drain color chart—a valuable tool for tracking progress and identifying early warning signs of complications.
Understanding the JP drain color chart
Interpreting the color and quantity of JP drain output is a critical component of post-surgical monitoring. For home health nurses, these observations guide timely decisions and help detect early signs of infection or delayed healing.
To support this process, we’ve created a free, downloadable JP Drain Chart PDF. This tool allows patients and caregivers to log drainage color, volume, time of emptying, and any notable changes—creating a clear, structured record for both daily management and long-term follow-up.
Encourage patients to use this tracking resource consistently, keep it visible in their care area, and bring it to all follow-up appointments to reinforce safe at-home care and enhance collaboration with their care team.
JP Drain Chart PDF
Fill out the form to unlock your free PDF!
Common drainage colors and what they indicate
Recognizing what different drainage colors mean can help both clinicians and caregivers determine when healing is progressing as expected, and when intervention may be needed. While drainage may vary based on the type of procedure and the phase of recovery, the JP drain color chart serves as a practical reference for assessing wound status.
Drainage Color | What It Typically Means |
Bright red | Normal immediately after surgery (active bleeding) |
Light pink | Healing in progress (serosanguineous fluid) |
Pale yellow or clear | Healing in progress (serous fluid) |
Cloudy yellow or tan | Possible infection – evaluate for other signs (odor, fever, swelling) |
Green, foul-smelling | Likely infection – notify healthcare provider promptly |
Reminder: The JP drain color chart can help track whether drainage is progressing appropriately, as it should gradually lighten and clear over time. If output becomes darker, thicker, develops a strong odor, or changes suddenly, it may be a sign of infection or other complication.
JP drain care best practices for home health nurses
Evidence-informed care of Jackson-Pratt drains is key to minimizing infection risk and supporting timely, complication-free recovery in the home setting. As the primary clinicians overseeing postoperative care, home health nurses play a central role in educating patients, performing daily assessments, and ensuring continuity of care.
The following breakdown outlines essential JP drain care procedures that align with current nursing standards and best practices in home health wound care:2
Emptying and reactivating the drain
This step is essential to maintaining negative pressure within the drainage system, ensuring proper function, and preventing fluid accumulation that can delay tissue healing or increase infection risk. It also offers a valuable opportunity to assess the character and quantity of output. Reviewing the output with a JP drain color chart allows clinicians to identify trends that may require escalation or intervention.
Frequency: Every 8 to 12 hours or when the bulb is half full.
Steps:
Perform hand hygiene and don clean gloves.
Carefully open the bulb stopper, avoiding spillage.
Pour drainage into a calibrated measuring container and document the color, consistency, and volume.
Compress the bulb completely and replace the stopper to restore suction.
Note: If the bulb does not remain compressed, assess for a suction failure or air leak, and notify the provider if unresolved.
Cleaning and dressing the insertion site
This step reduces local microbial load and supports skin integrity around the drain. A standardized cleansing technique also minimizes the risk of introducing contaminants to the insertion site.
Cleanse the site using saline or mild soap and water, beginning at the center and moving outward in a circular pattern.
Apply split gauze around the insertion point unless otherwise directed by the ordering provider.
Secure the dressing with medical tape, ensuring the tubing and any sutures remain undisturbed.
Tip: If sutures are present, reinforce with the patient that the tubing should not be pulled, shifted, or handled unnecessarily. Educate caregivers on gentle dressing changes to avoid inadvertent dislodgement.
Infection control reminders
This step ensures both patient and clinician safety while maintaining regulatory compliance with infection prevention standards in the home health setting.
Perform hand hygiene before and after all JP drain-related care.
Prepare and organize supplies on a clean barrier surface before beginning.
Use a new pair of gloves for each phase of the procedure or between wounds.
Dispose of used dressings and supplies in a biohazard bag or via approved double-bagging technique.
Tip: Encourage patients to maintain a clean, dedicated care area in the home and to consistently wash their hands before and after any self-care tasks involving the drain.
Recognizing when to escalate care: Signs of JP drain-related complications
Home health nurses play a critical role in detecting complications before they escalate. While variations in JP drain output can be expected throughout recovery, certain clinical findings warrant immediate reassessment and provider notification. Prompt escalation in these situations can help prevent adverse outcomes such as infection, hematoma formation, or delayed wound healing.
Indicators that require immediate clinical evaluation:
Cloudy, tan, green, or foul-smelling drainage: These changes may indicate the presence of infection. Evaluate for accompanying symptoms such as fever, localized tenderness, or malaise.
Sudden increase or complete cessation of output: A rapid rise in drainage may suggest internal bleeding or seroma formation. Conversely, an abrupt stop in output could reflect tubing obstruction or displacement.
Leakage around the insertion site: Excess moisture or saturation at the site may signal poor seal integrity or drain malfunction.
Loss of suction (bulb fails to stay compressed): This can indicate air entry into the system or failure of the drainage mechanism. Inspect the tubing and stopper; reinforce secure closure as needed.
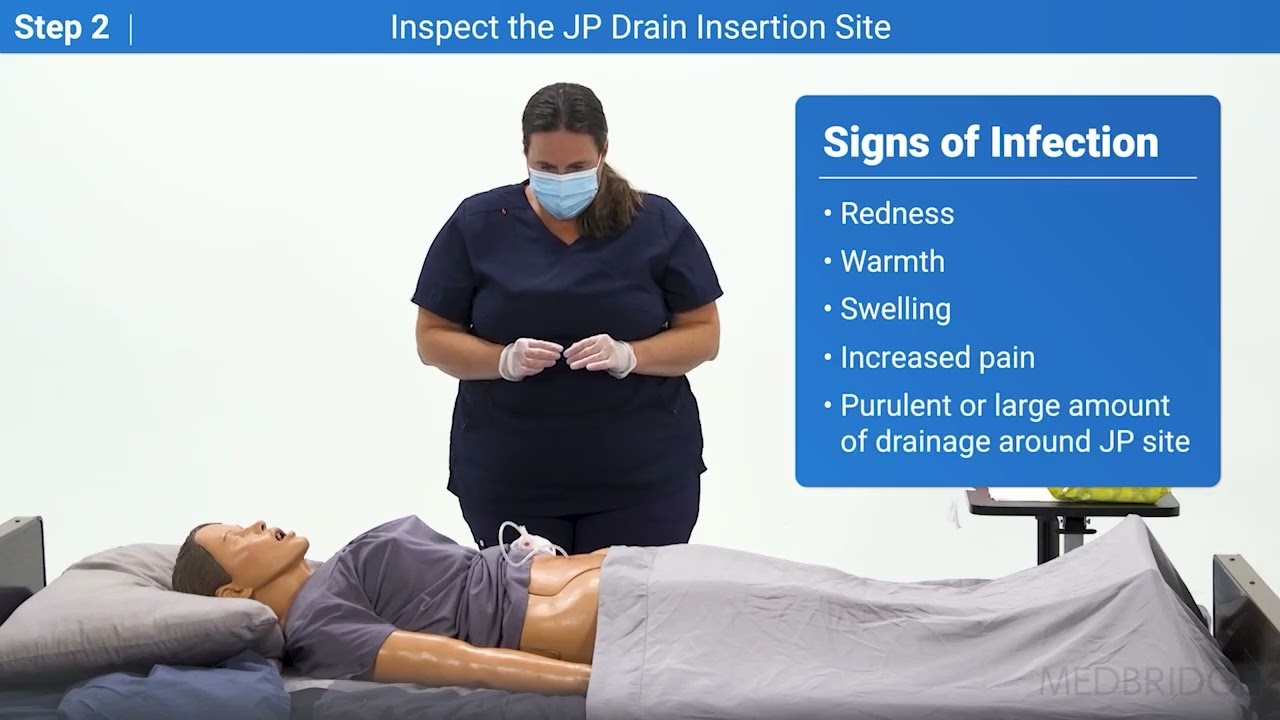
Clinical signs of local or systemic infection: These include erythema, edema, warmth, increased pain at the site, purulent discharge, or a temperature exceeding 101°F.
Clinical protocol: If any of these signs are observed, notify the managing physician or surgical team immediately. Document all findings, including subjective symptoms reported by the patient or caregiver, and outline any interventions taken.
Educating patients and caregivers on JP drain care
Home health nurses must ensure the safe and effective management of JP drains in the home setting. This can be achieved by providing clear, hands-on instruction to both patients and caregivers, emphasizing infection control measures and empowering families to confidently manage postoperative recovery.
Core teaching points for patients and caregivers:
Emptying the JP drain: Instruct the patient or caregiver to empty the drain every 8 to 12 hours—or when the bulb is half full—using proper hand hygiene and technique to maintain suction and avoid contamination.
Tracking drain output: Encourage consistent use of the JP Drain Chart PDF to log time, volume, color, and any abnormalities. This documentation aids providers in evaluating healing and determining when drain removal is appropriate.
Understanding drainage colors: Review the JP drain color chart together and explain what changes are expected (e.g., red to clear), and when a color shift may signal concern.
Recognizing signs of infection: Teach patients how to monitor for redness, swelling, increased pain, fever above 101°F, or foul-smelling/cloudy drainage. Stress the importance of reporting these signs promptly.
Knowing when to seek medical attention: Reinforce the need to call their provider if the drain becomes dislodged, the output changes significantly, or suction is lost.
Reinforce that patients should keep the chart accessible and bring it to follow-up appointments as part of their ongoing care plan. Incorporating patient education into daily routines empowers individuals to actively participate in their care—improving outcomes, supporting continuity, and reducing preventable complications.
Driving better outcomes through JP drain care
Effective JP drain care requires more than technical skill—it demands clinical judgment, structured routines, and proactive education. By consistently monitoring drain output, recognizing red flags, and using tools like the JP drain color chart, you can play a pivotal role in preventing complications and promoting optimal recovery.
Are you ready to deepen your expertise and stay sharp on best practices? Explore step-by-step demonstrations and practical guidance in our course, Wound Care: Jackson-Pratt Drain (JP Drain) Care and Removal, especially designed to support home health nurses in delivering confident, patient-centered care.
References
Memorial Sloan Kettering Cancer Center. (2023, July 11). Caring for your Jackson-Pratt drain. https://www.mskcc.org/cancer-care/patient-education/caring-your-jackson-pratt-drain
Knowlton M. C. (2015). Nurse's guide to surgical drain removal. Nursing, 45(9), 59–61. https://doi.org/10.1097/01.NURSE.0000470418.02063.ca
Below, watch Carrie Adkins demonstrate steps one and two of JP drain care in this brief clip from her Medbridge Clinical Procedure Manual training in "Wound Care: Jackson-Pratt Drain (JP Drain) Care and Removal."
Meet the Author


Subscribe to Our Newsletter
Related Posts

November 4, 2015
Blowing Bubbles with Chest Drains
By Greg Adams

April 16, 2020
Incorporating Telehealth into Home Health Care Part 1: Practical Strategies
By Kenneth L. Miller, Kara Gainer, and Ellen Strunk

April 9, 2020
Best Practices for Home Health Workers During the COVID-19 Pandemic
By Lisa A. Gorski

March 20, 2025
Home Health Documentation Template: A Guide to Clear, Compliant, and Consistent Records
By Tina Marrelli